NPS SUPPORT
  • Blog
    • Join Our Mailing List
  • Home
  • Our Services
    • License & Support
    • Fee Schedule
    • LSA Acknowledgement Form
    • DatasymPRO Acknowledgement Form
  • Support
    • Downloads
  • Remote Meetings
    • Join Webex Meeting 1
    • Join Webex Meeting 2
  • Products
    • Advantage
    • Datacap
    • CradlePoint Routers
    • Receipt Paper
    • Thermal Printers
    • PartnerTech All-In-One POS
    • Touch Dynamic
    • Cash Drawers
    • Scanners
    • Ingenico
  • Training
    • Training Documents
    • Training Videos
  • Contact
    • Contact Us
    • About Us

NPS Blog

Announcements, Park visits, Training, and Tip of the Week

How to Set Up a New User On An Advantage/Comm2000 Computer

6/8/2016

 
Picture
So you have a new employee at your park that needs to access Comm2000 and Advantage from their own login. The icons are there and everything, but when they click on it, it doesn't work. That is because they haven't gone through the setup process for their username. Don't worry, it is an easy fix.

Before starting this process, you need to get a hold of your IT staff so that they can add the new user to the Active Directory Group. They should know what this is, but if they need help, have them give us a call. Once that process is completed, begin the process below under the new employee login.

Step 1


  • Click on the Start Button
  • Type “Access”
  • Click on “Microsoft Access 2010”
  • If prompted with “Help Protect and Improve Microsoft Office”
    • Choose Don’t make changes
    • Click ok
  • On the Left, Click on “Options”
  • On the Left, Click on “Trust Center”
  • On the right, Click on “Trust Center Settings”
  • On the Left, “Click on “Macro Settings”
  • In the middle, choose “Enable all macros…”
  • Click [Ok]
  • On the left, Click on “Customize Ribbon”
    • In the right hand box
      • Click on the word “Add-In’s”.  (This will highlight it.)
      • Use the arrow on the right to move it to the # 2 position, between “Print Preview” and “Home”
  • Click [OK]
  • Close Access (Click on the red X )

Step 2

  • Click on the Start Button
  • Type “Comm2000”
  • Click on “Setup Comm2000”
  • Click on [Yes] when prompted “Do you want to allow the following programs to make changes to the computer?
  • Click on [OK]
  • Close Comm2000 (Click on the red x)

At this point your icons should work and you will be able to do your work without any interruption. We know that this process has a lot of steps and it can be easy to get lost. Go ahead and give us a call if you have any problems and we'll help you sort them out. 

Remote Meetings Update

5/25/2016

 
Picture
For those of you who remember Juniper meetings, that service was discontinued late in 2015. We were unaware of the decision until we called those in charge and asked why it wasn't working. They informed us of what they had done and told us that we could use 3 different remote meeting services to continue our work with the National Park Service. That is what we have done since.

The 3 services they told us we could use were Join.Me, WebEx, and GoToMeeting. Over the past several months we have discovered that Join.Me is the most useful of these 3 options. It has every function that we need to work with our clients and those functions all work in the free version of the software. There is a little bit of a delay between what is happening on your screen vs. our screen, but all in all it is our preferred method.

Another thing we really like about the service is that you are able to download the software and it puts an icon on your desktop. When you call in for support, you can simply click that icon and get the meeting going right away. Having fewer steps is always a favorable option from a phone support standpoint.

As always, check with your IT before deciding which sort of Remote Meeting you should use. Let them know that Join.Me is the easiest for the work we need to do, but if they have a different opinion on which should be used, we always defer to their judgment. But again, Join.Me has all of the features we need for the best price; free.

Park Personnel Changes

2/17/2016

 
Picture
In the National Park Service, personnel changes can happen fairly often. As people move in and out of Fee Programs there are certain procedures that need to take place to insure a smooth transition. Especially when Fee Managers are changed, we highly recommend that you call us to help you with the change.

Things that need to be updated include:
  1. Adding them as a new employee in Advantage.
  2. Setting them up as an Administrator in Advantage.
  3. Adding them as a new user in Comm2000.

If the new employee coming in has never used Advantage before we are more than willing to set up a time to do a training with them. We want to make sure that they are as comfortable as possible with the software so that their job is more manageable. 

Where Is My Shift?

1/27/2016

 
Picture
The day is over and the cashiers have finished for the day, so now it is time to process all of the transactions in Advantage. You perform communications in Comm 2000, UDatamod processes the files, and you begin your work in Advantage 5. Everything is going smoothly when you realize that an entire Cashier Shift is missing! You have the shift before it , but where is the missing one?

Don't worry, it's not gone forever. There are a few simple reasons why the shift may not be appearing. Logic would tell us that something happened to it between the Cash Register and your Remit Computer, and that is the case. Here are the top two reasons why your shift isn't there;

  1. The Cashier on that shift did not run their Z-Report: When we run a Z-Report, we are basically telling the Register that the shift is ready to be transferred out. If a Cashier neglected to run this simple process, the shift will not transfer.  Someone needs to return to that register and run the report before trying to communicate again.
  2. There are communication problems with your network: This is the biggest reason why a shift may be lost. If the network commonly drops throughout the day it is possible that you tried to communicate at the same time your network decided to go down. With this problem, you should wait for a moment and try to communicate again. If you experience the loss of a shift often, we highly recommend that  you upgrade your network in some way. Having a strong network will make your job a lot easier because many of the errors you have will no longer happen. 

These fixes are good when your most recent shift or shifts are the missing ones. But what if the missing shift is sandwiched between two that communicated successfully. This requires a little more work because it means that you will have to enter that shift manually. Using the printed Z-Report you will need to enter the product sales one by one.

Please don't hesitate to call us when you are experiencing an issue. We can help you identify what went wrong quickly and help fix it.

How to Enable An Employee to Do Remits in Advantage

11/4/2015

 
Whether you are leaving on your long awaited vacation and need someone to do your remits for you or you simply want another person to carry this burden with you, enabling an employee in Advantage to do remits is very simple.

After you open Advantage, follow this path:

7-Administration Menu

3-Edit Passwords

2-Edit Employee Passwords

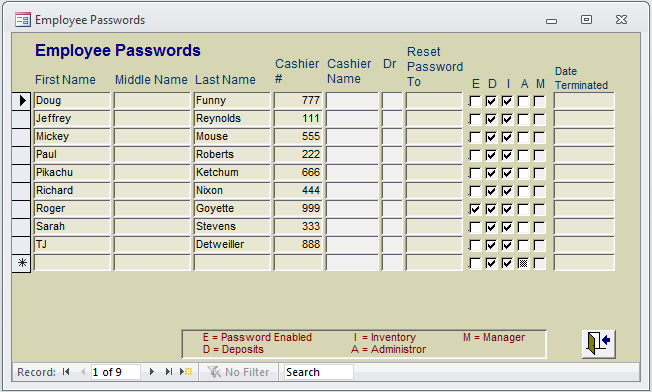
This will bring you to a screen like this one which shows your employee list.
Picture
Notice how the "E" column is only checked for Roger. This means that he is the only one who can perform remits. Our goal is to Enable Remits for Doug Funny as well.

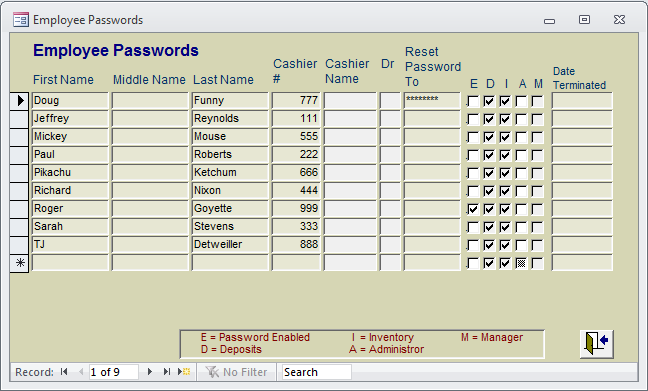
All you need to do is type a password for him in the "Reset Password To" column. It will only ask you for it once so make sure you get it right the first time and that you can remember it.
Picture
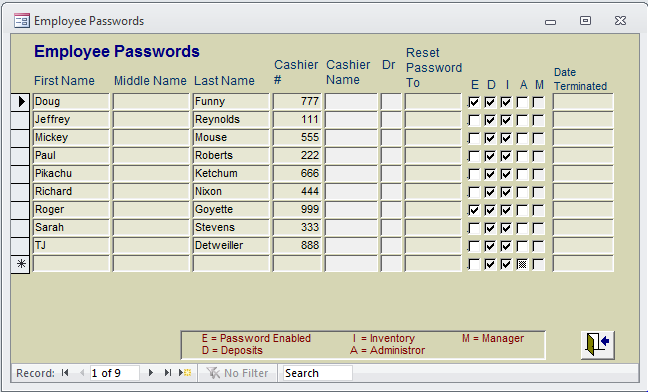
After you fill in the password, a box will pop up that says "Employee Password Has Been Reset". Go ahead and click "Okay". You will notice that the "E" box still isn't checked. All you need to do is press the "Back Door" button and go back into the "Edit Employee Passwords" screen. 

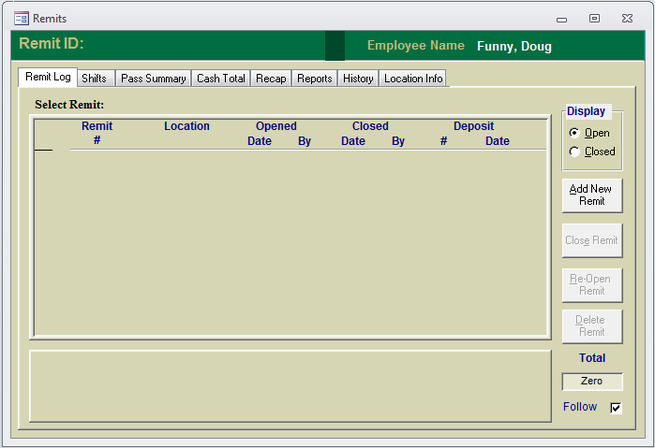
Now the "E" box is checked for Doug Funny and he is able to help you with your remits.
Picture
Picture

    Archives

    December 2020
    September 2020
    August 2020
    July 2020
    December 2018
    October 2018
    August 2018
    June 2018
    April 2018
    March 2018
    January 2018
    December 2017
    March 2017
    January 2017
    December 2016
    October 2016
    September 2016
    August 2016
    July 2016
    June 2016
    May 2016
    April 2016
    March 2016
    February 2016
    January 2016
    December 2015
    November 2015
    October 2015
    August 2011
    July 2011

    Categories

    All
    Advantage
    Back Office
    Back-Office
    Comm2000
    EMV
    Highlights
    Network
    Park Visits
    Registers
    Support
    Tip Of The Week
    Training

    RSS Feed

    Please call support if you have any questions.
    ​801-399-9200

Intermountain Advantage Group - 801-399-9200 - helpdesk@npssupport.com
Our support hours are as follows:
​Mountain Standard Time
Sat-Sun 9am to 1pm 
Mon-Fri 6am to 6pm
Photos used under Creative Commons from stevendepolo, CJS*64 "Man with a camera", pfctdayelise, _paVan_, awnisALAN, wwarby, greg westfall., Calvine Wu, Oregon National Guard, Wilson Hui, Sam Howzit, StockMonkeys.com, romanboed, crosathorian
  • Blog
    • Join Our Mailing List
  • Home
  • Our Services
    • License & Support
    • Fee Schedule
    • LSA Acknowledgement Form
    • DatasymPRO Acknowledgement Form
  • Support
    • Downloads
  • Remote Meetings
    • Join Webex Meeting 1
    • Join Webex Meeting 2
  • Products
    • Advantage
    • Datacap
    • CradlePoint Routers
    • Receipt Paper
    • Thermal Printers
    • PartnerTech All-In-One POS
    • Touch Dynamic
    • Cash Drawers
    • Scanners
    • Ingenico
  • Training
    • Training Documents
    • Training Videos
  • Contact
    • Contact Us
    • About Us